FatJar & ThinJar
FatJar : 即UberJar,表示包含所有依赖包的 jar 包。启动的时候指定一个jar包就可以加载所有的业务代码及依赖包。如果依赖项较多,最终打出来的Jar包会庞大到数G。FatJar存在一个很大的问题:某次更新仅影响了很小一部分代码却要重新生成一个体积庞大的Jar包。如果再加入微服务、Docker镜像打包、跨网段传输等影响,大体积的劣势会更加明显。
ThinJar : 只含本maven项目下的类的Jar包,体积小,需要手动维护第三方Jar的lib目录。
(StackOverflow上的这个问题把ThinJar定义为本APP的代码+直接依赖,有点歧义但不纠结)
Jar的格式
Jar包以zip的方式压缩了一组类及其相关资源。目录结构大致如图

tips :VIM可以直接编辑压缩文件或者Jar包。
其中META-INF/MANIFEST.MF是Jar包的元数据文件。举个例子
|
|
条目含义都很清晰,其中需要关注的是Main-Class,它指定了程序启动的入口类。
Jar的启动方式
由此可以介绍一下可执行Jar与非可执行Jar的区别。
-
可执行Jar
在
MANIFEST.MF指定了Main-Class,通过java -jar xxx.jar可以直接执行程序。 -
非可执行Jar
没有指定
Main-Class,要执行它则需要通过java -cp 'MyProgram.jar:libs/*' main.Main。
特别需要注意的是:-jar 与 -cp 不可以共存,如果同时使用,后者将被忽略。-cp指定多个加载目录很容易,而-jar如何增加额外的lib路径呢?
java提供了一个参数loader.path来指定其他jar的加载路径,举个例子:java -Dloader.path=./lib -jar app.jar
三种打包Fatjar方法
-
非遮蔽方法(Unshaded)
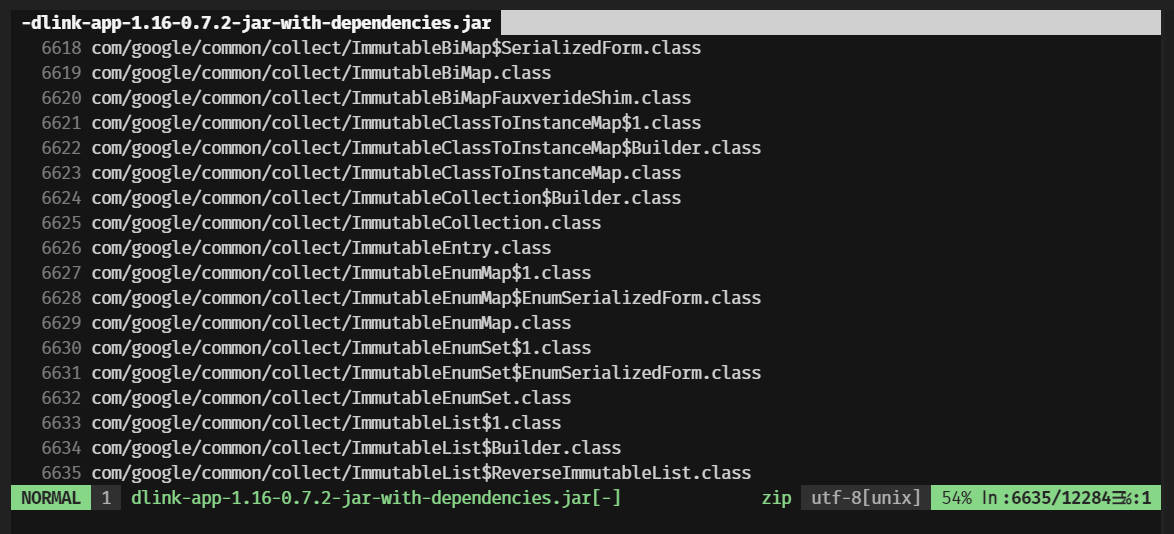
解压所有 jar 文件,再重新打包成一个新的单独的 jar 文件。使用maven-assembly-plugin插件实现,其中预定义的jar-with-dependencies descriptor会打包编译结果,并带上所有的依赖,如果依赖的是 jar 包,jar 包会被解压开,平铺到最终的 uber-jar 里去。输出格式为 jar。
举个dlink的例子
1 2 3 4 5 6 7 8 9 10 11 12 13 14 15 16 17 18 19 20 21 22 23 24 25 26<plugin> <groupId>org.apache.maven.plugins</groupId> <artifactId>maven-assembly-plugin</artifactId> <version>${maven-assembly-plugin.version}</version> <configuration> <descriptorRefs> <descriptorRef>jar-with-dependencies</descriptorRef> </descriptorRefs> <archive> <manifest> <!-- 可以设置jar包的入口类(可选) --> <mainClass>com.dlink.app.MainApp</mainClass> </manifest> </archive> <outputDirectory>${project.parent.parent.basedir}/build/extends</outputDirectory> </configuration> <executions> <execution> <id>make-assembly</id> <goals> <goal>single</goal> </goals> <phase>package</phase> </execution> </executions> </plugin>结果如图
-
遮蔽方法(Shaded)
Shaded也会将所有的依赖打进jar包,与Unshaded不同之处在于它会将依赖重命名,重命名的过程即是Shade。这么处理的原因是有些时候程序需要使用同名依赖的不同版本,而相同全限定名的类只会被加载一次,如果使用了加载版本所不具有的方法就会抛出Class Not Found异常。同时,Java 代码中的所有引用在relocation后都使用被修改后的包名。实现Shaded打包的方式主要是使用
maven-shade-plugin插件,此外还有Google的jarjar.jar。举个Chunjun的例子
1 2 3 4 5 6 7 8 9 10 11 12 13 14 15 16 17 18 19 20 21 22 23 24 25 26 27 28 29 30 31 32 33 34 35 36 37 38 39 40 41 42 43 44 45 46 47 48 49 50 51 52 53 54 55 56 57<plugin> <groupId>org.apache.maven.plugins</groupId> <artifactId>maven-shade-plugin</artifactId> <executions> <execution> <phase>package</phase> <goals> <goal>shade</goal> </goals> <configuration> <createDependencyReducedPom>false</createDependencyReducedPom> <transformers> <transformer implementation="org.apache.maven.plugins.shade.resource.ManifestResourceTransformer"> <mainClass>com.dtstack.chunjun.Main</mainClass> </transformer> </transformers> <artifactSet> <includes> <!--only include slf4j api --> <include>org.slf4j:slf4j-api</include> <include>com.google.guava:*</include> <include>com.google.code.gson:*</include> <include>org.apache.httpcomponents:*</include> <include>io.prometheus:*</include> <include>org.apache.avro:*</include> <include>com.fasterxml.jackson.core:*</include> <include>commons-*:*</include> </includes> </artifactSet> <relocations> <relocation> <pattern>com.google.common</pattern> <shadedPattern>shade.core.com.google.common</shadedPattern> </relocation> <relocation> <pattern>com.google.thirdparty</pattern> <shadedPattern>shade.core.com.google.thirdparty</shadedPattern> </relocation> <relocation> <pattern>org.apache.http</pattern> <shadedPattern>shade.core.org.apache.http</shadedPattern> </relocation> </relocations> <filters> <filter> <artifact>*:*</artifact> <excludes> <exclude>META-INF/*.SF</exclude> <exclude>META-INF/*.DSA</exclude> <exclude>META-INF/*.RSA</exclude> </excludes> </filter> </filters> </configuration> </execution> </executions> </plugin>其中
ManifestResourceTransformer用于指定MANIFEST.MF的mainClass,使Jar包成为一个可执行Jar包。includes指定打包依赖的白名单,仅有白名单内的依赖会被打进FatJar。relocations标签将类进行重命名,打包之后重命名的目录如下。1 2 3 4 5 6 7 8 9└── shade └── core ├── com │ └── google │ ├── common │ └── thirdparty └── org └── apache └── http -
嵌套方法(Jar of Jars)
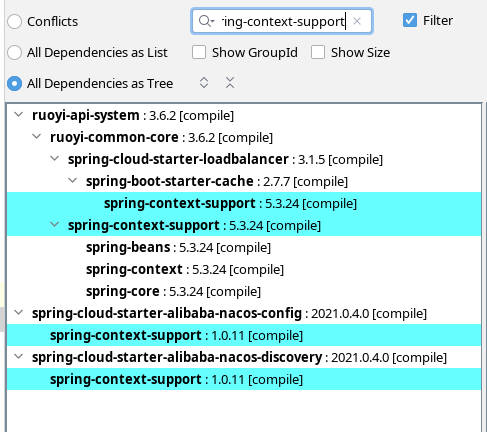
Jar of Jars也称nested-jars。用这个方法可以直接将依赖jar打进jar包中,可以避免同名不同版本的依赖被覆盖。但是这个方法不被 JVM 原生支持,因为 JDK 提供的 ClassLoader 仅支持装载嵌套 jar 包的 class 文件。所以这种方法需要自定义 ClassLoader 以支持嵌套 jar。实现的打包插件是spring-boot-maven-plugin,它会把所有依赖的jar包放进BOOT-INF/lib下,并使用自定义的ClassLoaderJarLauncher和PropertiesLauncher进行加载。举个ruoyi的例子。打包配置比较简单
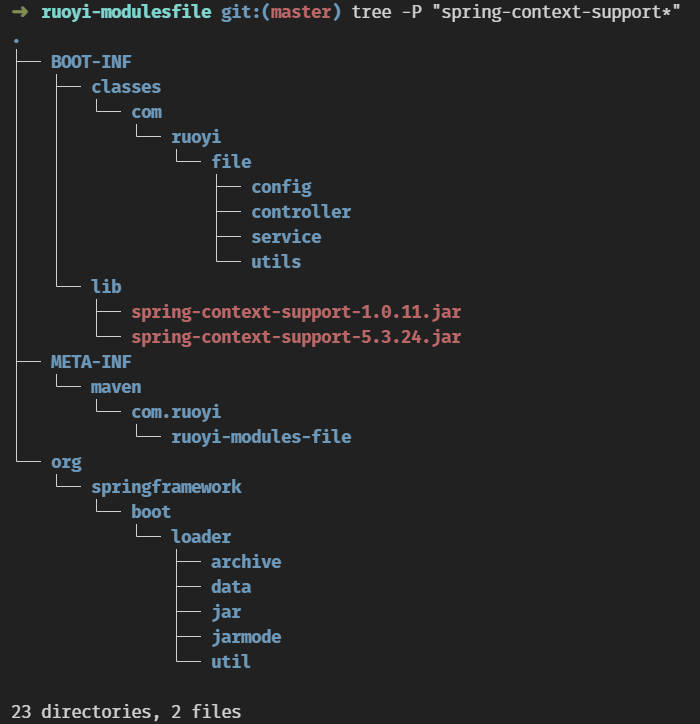
1 2 3 4 5 6 7 8 9 10 11<plugin> <groupId>org.springframework.boot</groupId> <artifactId>spring-boot-maven-plugin</artifactId> <executions> <execution> <goals> <goal>repackage</goal> </goals> </execution> </executions> </plugin>存在同名不同版本的依赖:
打包结果
常用打包插件使用方法
maven-assembly-plugin
maven-shade-plugin
spring-boot-maven-plugin
MANIFEST.MF 的 Main-Class
- JarLauncher : loader.path失效
- PropertiesLauncher
maven-dependency-plugin
maven-jar-plugin
maven-surefire-plugin
完整案例
flink
springboot
参考1
|
|
docker 部署
参考
Spring Boot 解析系列(二):FatJar 启动原理
Apache Maven Assembly Plugin 官方文档
Apache Maven Shade Plugin 官方文档